Understanding Projects in Rakenne
What a project is, how it differs from a skill and a session, and how to use the full workspace: files, chat, preview, export, and project management.
Rakenne is built around three core concepts: Projects, Skills, and Sessions. Understanding how they relate to each other is the first step to using Rakenne effectively.
Projects, Skills, and Sessions — what each one is
A Project is your working environment. It contains a file workspace, a conversation with the agent, and any skills you have installed. Each project is isolated: files, conversations, and settings are scoped to it. Think of a project as a dedicated desk for one piece of work — a contract you’re drafting, a regulatory submission, a risk file.
A Skill is a reusable document-elaboration workflow. Skills are like specialized assistants the agent can call on. When you install a skill into a project, the agent learns when to use it and how. A skill named “FDA Submission Wizard”, for instance, knows the structure and requirements of a 510(k) submission. Skills are independent of projects — the same skill can be installed in many projects. See What Is a Rakenne Skill? for a deeper look at how skills work.
A Session is one continuous conversation with the agent inside a project. A project can have many sessions over its lifetime. The session keeps track of what was said and what files the agent wrote or read. Starting a new session gives you a clean conversation while keeping all your files intact. See Session Management and Context Hygiene for more on this.
The relationship is simple: a project holds sessions and has skills installed; skills guide the agent during each session.
The Projects screen
When you sign in, the first thing you see is the Projects screen. It lists all your active projects, sorted by last activity.
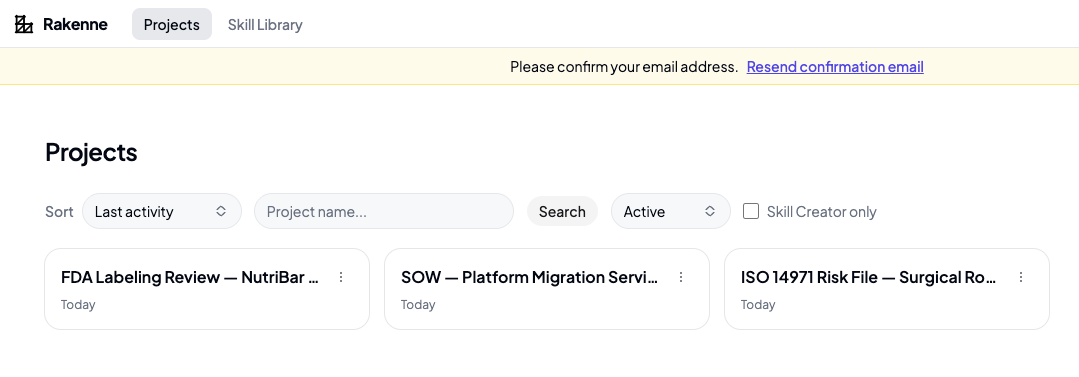
From here you can:
- Search by project name using the search box.
- Sort by last activity (default) or creation date.
- Filter between active and archived projects.
- Filter to Skill Creator only — a checkbox that narrows the list to projects using the Skill Workshop template, useful if you author many skills.
- Star a project from its actions menu to promote it to the top of the list.
- Create a new project with the New project button.
Creating a project
Click New project (or Create your first project on an empty screen). A dialog appears:
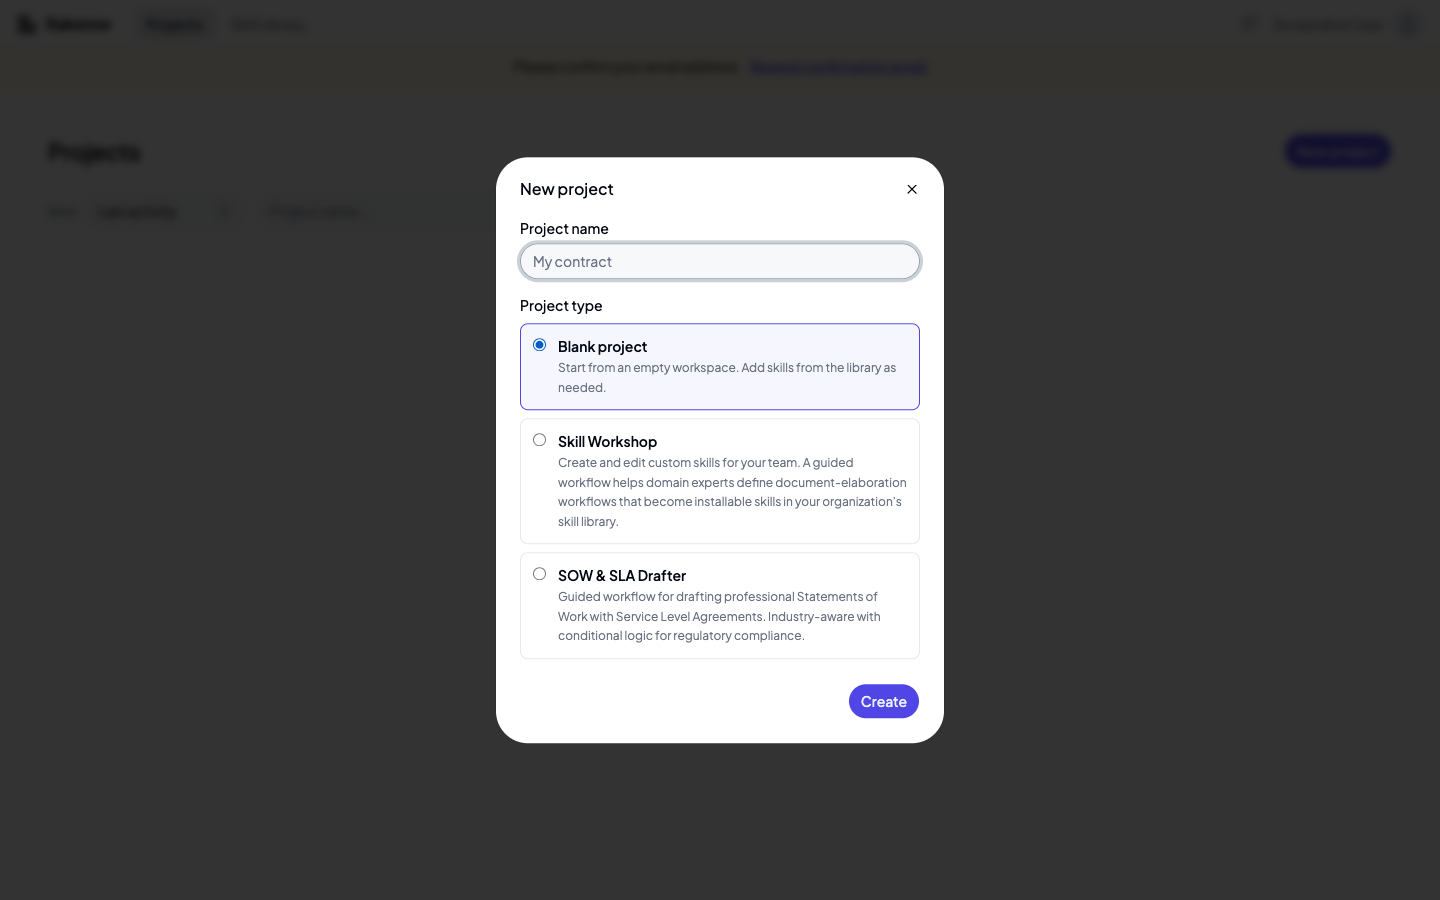
Give the project a name and choose a project type:
- Blank project — an empty workspace. You add skills from the library as needed. Good for general document work.
- Skill Workshop — a specialized workspace for creating skills. It comes pre-loaded with the skill-creator skill and a structured workflow. Use this when you want to build and publish reusable workflows for your team. See Creating Skills with the Skill Workshop for the full guide.
- SOW & SLA Drafter — a pre-configured workspace for drafting Statements of Work with Service Level Agreements.
Click Create. Rakenne provisions a workspace and opens it.
The workspace screen
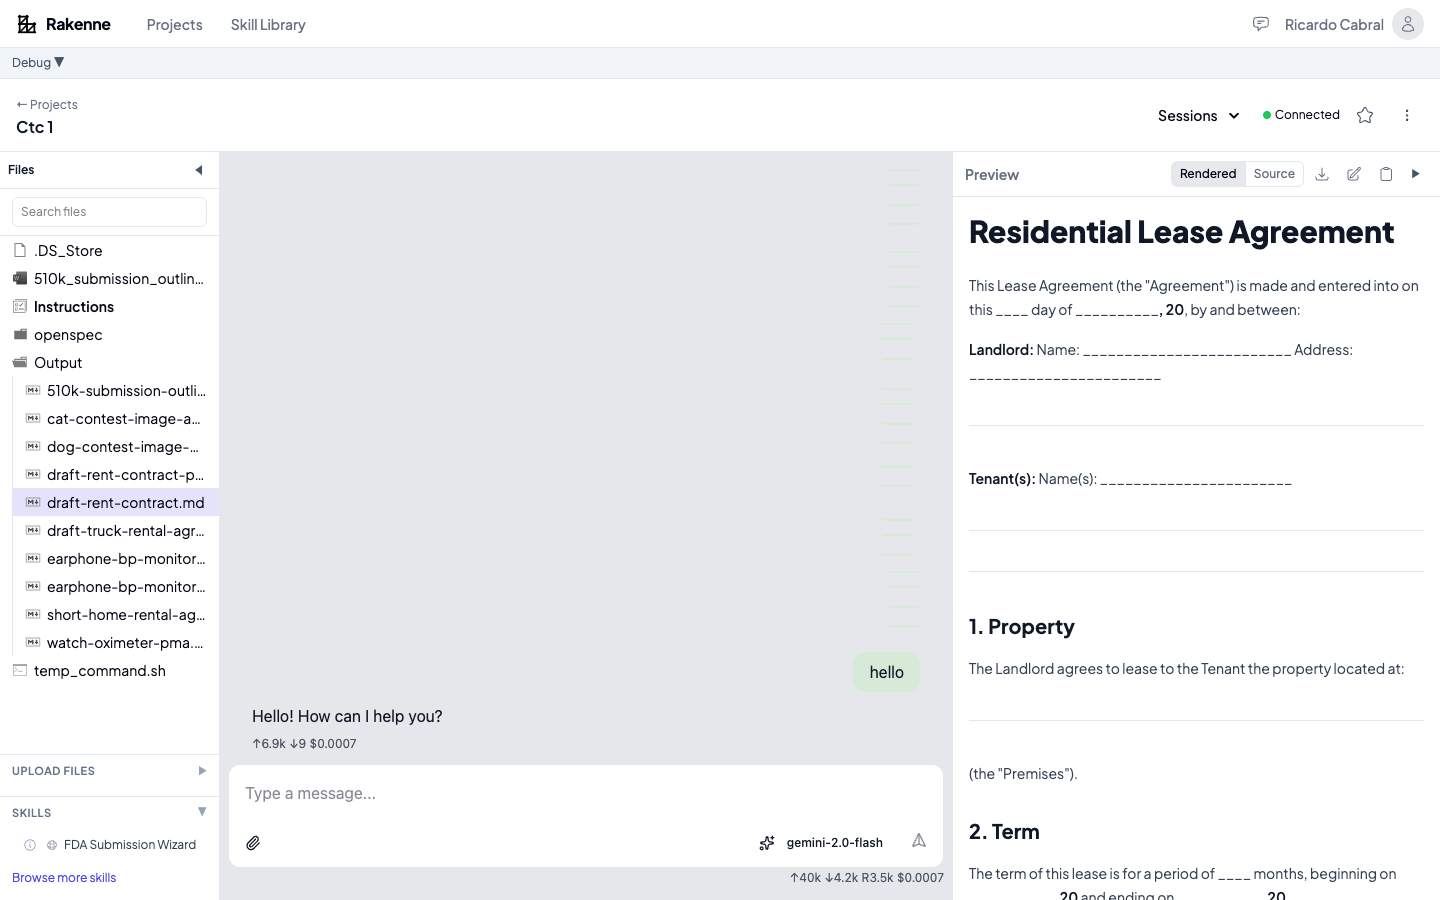
The workspace is where you do the actual work. It has three main areas side by side: the left panel (files and tools), the chat area (center), and the preview panel (right).
Here is how each part of the workspace is organized:
Header
The header shows the project name and three controls:
- Sessions — a dropdown to switch between sessions or start a new one.
- Connected / Disconnected — the agent status. Green means the agent process is running and ready.
- Star — toggle to favorite the project. Starred projects sort to the top of the Projects screen.
- ⋮ (Project actions) — the menu for project-level actions (covered below).
Left panel — Files, Upload, Skills
The left panel has three collapsible sections. Click the section header to expand or collapse it. The panel itself can be collapsed entirely with the ◀ button to give the chat more space.
Files — the workspace file tree. The agent writes output documents here, and you can upload reference files. A shortcut is always shown at the top:
- Output — the directory where the agent saves generated documents. Click it to expand and see all output files.
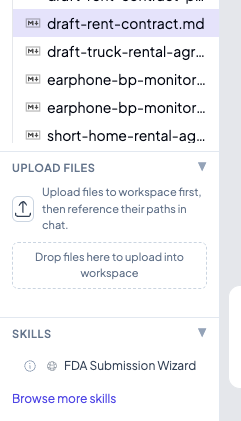
Upload files — a section you expand when you want to add files to the workspace. You can use the upload button or drag files directly into the drop zone. Uploaded files become available to the agent — you can tell it to read, summarize, or use them in a document.
Skills — shows the skills currently installed in the project. Each skill has a detail button (the circle-i icon) to see its description, tags, example prompts, and dependencies. A globe icon means the skill is publicly available in the library; a lock icon means it is private to your organization. The Browse more skills link takes you to the Skill Library where you can install additional skills.
Chat area — center
The chat is where you talk to the agent. Type a message and press Enter or click the send button. You can attach files to a message using the paperclip button — attached files go directly into the message rather than into the workspace file tree.
When the agent runs a tool — for example writing a file — the chat shows a tool call result inline:
Tool Call: Write file — Wrote document draft-rent-contract.md
This tells you exactly what the agent did, without you needing to check the file tree.
Preview panel — right
Click any file in the file tree to open it in the preview panel. Documents are rendered by default; switch to Source to see the raw text.
The preview toolbar has four actions:
- Download as… — export the document in your chosen format.
- Edit in full-featured editor — opens the file in a richer inline editor.
- Copy as rich text — copies the rendered content to your clipboard, ready to paste into Word, Notion, or a browser.
- ▶ — expand the preview to full width, hiding the chat.
Navigating files
The file tree in the left panel shows everything in your workspace. Folders are expandable — click a folder name to expand or collapse it. The Output folder is where the agent saves documents it writes.
Use the Search files box at the top of the file tree to filter by name. Type part of a filename and the tree updates immediately.
Click any file to open it in the preview panel. The selected file is highlighted in the tree.
Uploading files
- Expand the Upload files section in the left panel.
- Click Upload files to open a file picker, or drag files directly onto the drop zone labeled “Drop files here to upload into workspace”. You can select or drop multiple files at once.
- The files appear in the file tree immediately after upload.
Once uploaded, tell the agent where to find them: “Read the file I just uploaded and summarize its key clauses” or “Use the template in requirements.pdf as a reference for the new document”. The agent can read any file in the workspace.
File limits: up to 120 MB per individual file. On full accounts, up to 100 files and 1 GB total per upload batch.
Working with sessions
Click Sessions in the header to open the session dropdown.
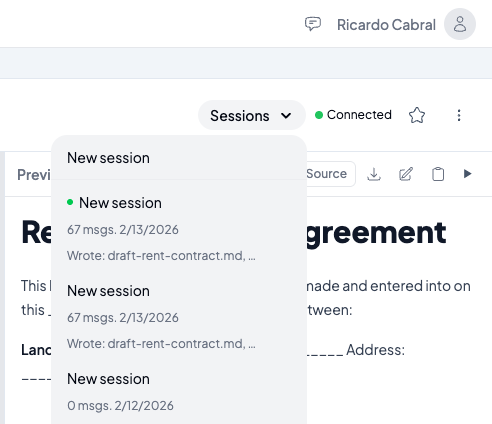
Each session in the list shows:
- Title — the session name (auto-generated as “New session” unless renamed).
- Message count and date — how many messages the session has, and when it was last active.
- Activity summary — a short note of what the agent did, e.g. “Wrote: draft-rent-contract.md, …”
The currently active session has a green dot next to it. Click any other session to switch to it — the chat history and context load for that session. Click New session at the top to start a fresh conversation while keeping all workspace files.
Previewing and exporting documents
Open a file from the file tree. The preview panel renders it on the right side of the screen. For text files you get a formatted view: headings, lists, tables, checkboxes, and code blocks all render correctly.
To export, click Download as… in the preview toolbar:
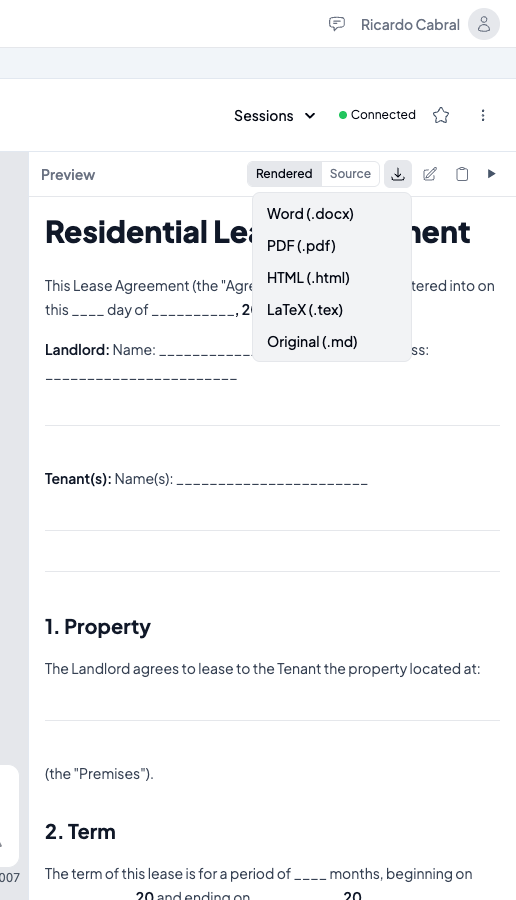
Available formats:
- Word (.docx) — opens directly in Microsoft Word or Google Docs.
- PDF (.pdf) — for sharing and printing.
- HTML (.html) — a self-contained web page.
- LaTeX (.tex) — for academic and technical publishing workflows.
- Original (.md) — the raw text file, unchanged.
You can also export the full conversation using Export chat as HTML in the project actions menu.
Project actions menu
Click the ⋮ button in the header to open the project actions menu.
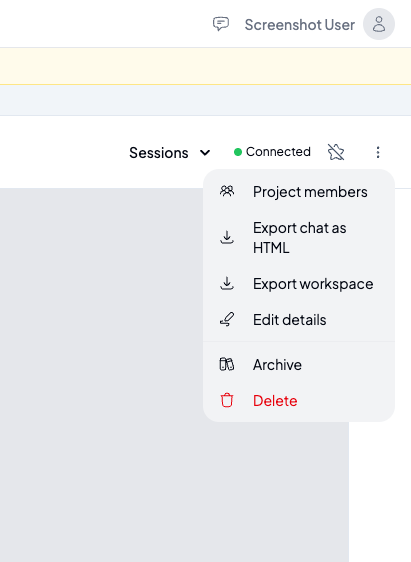
The menu has these options:
- Project members — view who has access to this project and their role (owner, editor, or viewer).
- Export chat as HTML — downloads the full conversation history as a formatted HTML file, useful for archiving or sharing with stakeholders who don’t have Rakenne access.
- Export workspace — downloads the entire workspace as a
.zipfile. This includes all files in the workspace (your uploads, output documents, theAGENTS.mdinstructions) but not the session conversation logs. Useful for backing up a project or moving files elsewhere. - Edit details — rename the project or update its description.
- Archive — moves the project out of the active list. Archived projects are still accessible through the status filter on the Projects screen (switch “Active” to “Archived”). Archiving does not delete anything.
- Delete — permanently deletes the project and all its files. This cannot be undone. A confirmation dialog appears before anything is removed.
Archiving and deleting projects
Archive when a project is complete but you want to keep the files and conversation for reference. Archived projects appear in the Projects screen when you set the status filter to “Archived”. You can unarchive a project at any time from its actions menu.
Delete when you no longer need the project and want to free up space. Deletion is permanent — the workspace files, conversation history, and all session data are removed.
Starring projects
Click the Star button (☆) in the project header to mark a project as a favorite. Starred projects sort to the top of the Projects screen regardless of activity date, making it easy to keep your active work front and center. Click it again to unstar.
You can also star a project from the Projects screen using the ⋮ actions menu on any project card.
What to do next
- Read Session Management and Context Hygiene to understand how to keep your conversations focused and efficient.
- Browse the Skill Library (top navigation → Skill Library) to find skills relevant to your domain and install them on your project.
- If you need a workflow that doesn’t exist yet, see Creating Skills with the Skill Workshop to build one.